Therefore, we’ve come up with methods to fix the issue if you’re using Twitch on Google Chrome. We’re sure that one or a combination of these will help you get rid of the problem. However, let’s first understand the reasons behind this issue.
Why Does Twitch Keep Buffering on Google Chrome
Here are some of the reasons why Twitch streams and videos might buffer on your web browser:
Lack of good internet connectivity. Server problems on Twitch. Bugs on Google Chrome. Outdated Network Drivers.
It is indeed difficult to point out a single reason why this problem might occur on Twitch. Hence, it is only probable that these reasons might be blamed for the problem. But what is relatively easy is to follow a few steps to get rid of the issue.
How to Fix Twitch Constantly Buffering on Chrome
Here’s everything you can do if Twitch keeps buffering on Google Chrome. We’ve outlined eleven different ways to troubleshoot this particular issue, with step-by-step procedures for all of them. Let us first check if Twitch is facing downtime.
1. Check if Twitch is Down
If Twitch is facing downtime caused by issues in their servers, it will affect their streaming services. So, all you need to do is wait for Twitch to get their servers up and running again. You can check the server status of a switch on a third-party website, or also keep up with updates via the official social media handles of Twitch. However, if all is well on Twitch’s end, there’s a toggle that you can use to improve the video streaming on Twitch. Jump to the next section to learn more.
2. Turn Off Low Latency on Twitch
This setting applies only to streamers. If you are one and are reading this article due to complaints from your viewers then it is recommended you turn on the low latency toggle on your account. This setting helps deliver your stream faster to viewers even if they don’t have a stellar internet connection. Here’s how you can turn this feature on. Step 1: Open Twitch on Chrome and tap on the profile icon in the top right corner. Step 2: Tap on Settings. Step 3: Tap on ‘Channel and Videos’. Step 4: Tap on Stream in the sidebar. Step 5: Select the option for Low Latency. You also must ensure you have a good internet connection for the best results, irrespective of how you access Twitch.
3. Check Internet Connectivity
Ensure that you have an internet connection with a decent speed to get your tasks done on the web browser. Further, also ensure you have an active internet plan by reaching out to your service provider. To quickly check your internet speed, you can visit fast.com and see the results yourself. Another effective fix for the issue is to clear the data in Chrome. Let’s see how that works.
4. Clear Chrome Data
A cache is a form of temporary data stored in local storage. It reloads elements of the application quickly instead of downloading them from the internet. However, a lot of cache means a lot of data and junk accumulation which are known to cause a few issues with an application. If Twitch keeps buffering, there is a chance that it is affected by the junk files present on Chrome. Here’s how you can clear it. Note: Your browsing and download history, cookies, and cache will be deleted from Google Chrome and unless selected, your passwords will not be deleted. Step 1: Click on the three dots icon on the toolbar and select Settings. Step 2: Click on ‘Privacy and security’. Step 3: Select ‘Clear browsing data’. Step 4: Click on the dropdown menu for the Time range and select the period for which you want to delete the browsing data. Step 5: Now, click on clear data. Another reason why you might face some issues on Twitch is because of the VPN or the Proxy connection. It’s best to turn it off.
5. Disable VPN and Proxy
While a VPN does a great job of routing your internet traffic through a private server, it isn’t flawless all the time. Therefore, a faulty VPN might be the reason why Twitch keeps buffering in Google Chrome. Make sure to turn off the VPN from the application you are using on Windows. If you are using VPN through a Chrome extension, ensure to turn off the extension to check if it fixes the issue.
6. Enable JavaScript
Websites and internet services use JavaScript to display and embed interactive content. To display videos and streams on the website, Twitch uses JavaScript to render them all. Hence, you must ensure that it is enabled on your browser. Step 1: Open Chrome, click on the three dots icon on the toolbar, and select Settings. Step 2: Select Privacy and security on the left pane and open Site settings. Step 3: Scroll down and click on JavaScript. Step 4: Ensure that you select the option for ‘Sites can use JavaScript’ to enable JavaScript. Also, ensure you haven’t added any exceptions to the Customized behaviors list. If this doesn’t fix the issue, you may also need to disable unwanted extensions on Chrome to fix the issue regarding playback on Twitch.
7. Disable Unwanted Extensions
Extensions and browser add-ons might add some extra functionality to your browser, but they could cause a few issues too. They might slow down Google Chrome and also affect Twitch streams. Therefore, it is recommended to disable unwanted extensions on Chrome. These include the ones you don’t use or the ones that are probably not from verified developers. Step 1: Open Chrome, click on the extensions icon in the toolbar, and select Manage extensions. Step 2: You will now see a list of installed extensions. Turn off the toggle to disable an extension and check if it solves the issue. Repeat this for all the installed extensions.
8. Enable Hardware Acceleration
Hardware Acceleration is a process in which hardware resources are used on your system to run the software, and ‘accelerate’ the task. We recommend turning it on since it results in better performance. Hence, there are chances that Twitch, which runs on your browser as a tab, will benefit from Hardware Acceleration and play the video in the best resolution. Step 1: Open Chrome, tap on the three dots icon in the toolbar, and select Settings. Step 2: Click on System in the sidebar. Step 3: Turn on the toggle for ‘Use hardware acceleration when available’. If none of the above methods work, you can try resetting all the settings on Chrome.
9. Reset Chrome
Resetting Google Chrome restores all of its settings to their default values. This will help if any misconfiguration is responsible for causing streaming issues on Twitch. This might help solve the issue. Follow the below steps to reset your web browser. Step 1: Open Chrome and click on the three dots icon in the toolbar. Select Settings. Step 2: Now select ‘Reset and Clean up’ in the left pane. Step 3: Select ‘Restore settings to their original defaults’. Step 4: Now, click on Reset settings to reset all settings on Chrome. That is everything you can do on Google Chrome. However, if the issue persists, let’s try making a few tweaks to your system to try fixing the issue.
10. Clear DNS Cache
A DNS cache is a virtual address book that contains information about all the websites you have visited. Accumulation of this cache can lead up to a lot of outdated information, which is known to cause issues while you are trying to access content online. Therefore, you should clear the DNS cache. Here’s how to do it. Step 1: Search for Command Prompt in the start menu and tap on ‘Run as administrator’. Step 2: Type or copy and paste the following code: Step 3: Exit the command prompt window once you receive the message ‘Successfully flushed the DNS Resolver Cache’. As mentioned earlier, an outdated network driver may be responsible for Twitch not loading or constantly buffering on Chrome. Here’s how to update your network driver.
11. Update Network Drivers
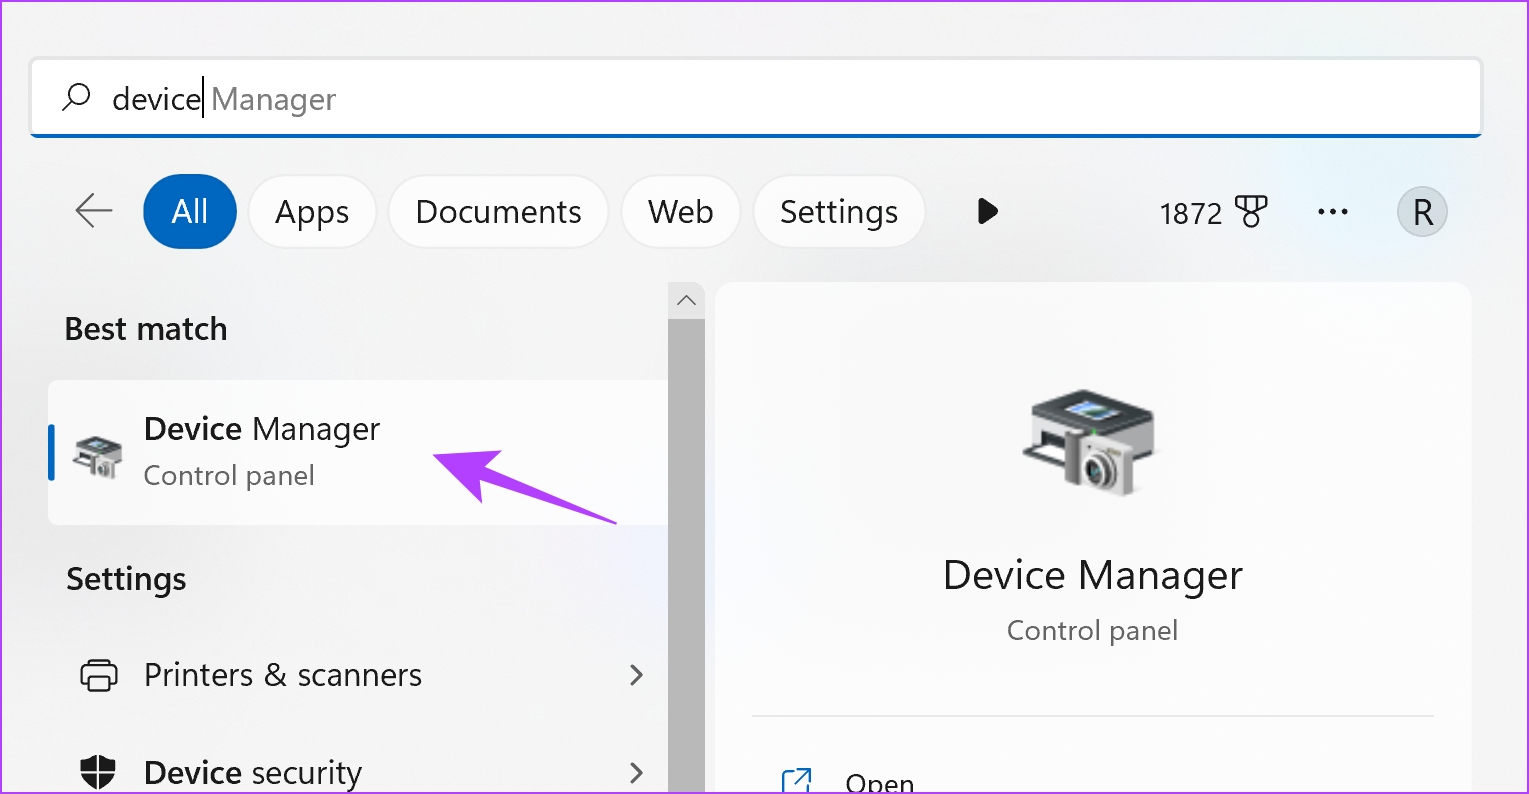
Network drivers are constantly updated to get rid of bugs causing issues to users. There is a good chance of fixing the buffering issue on Twitch once you update your network drivers. Here’s how to do it. Step 1: Open Device Manager from the start menu. Step 2: Tap on Network Adapters. Step 3: Right-click on your network adapter from the drop-down menu and tap on Update driver. This will update the network drivers on your PC.
Stream Twitch Without Any Buffering
We hope this article helped you stream Twitch content without buffering. So the next time you are facing glitches while watching streams, you know what to read. However, we do hope the developers continue to improve Twitch so that the quality and playback of streams remain consistent and users never run into issues like these in the first place. The above article may contain affiliate links which help support Guiding Tech. However, it does not affect our editorial integrity. The content remains unbiased and authentic.