In this article, we want to shed some light on what this issue is. Further, we also want to show you how you can fix the issue and quickly update to the latest version of iOS with ease. However, this problem occurs before the update is installed. Hence, your device is still switched on and you have some control over the problem.
What Does Preparing Update Mean on iPhone
Firstly, we need to understand that updating your iPhone isn’t a single-step process. There are multiple stages to it. The update file is first downloaded from Apple’s servers. Once the download is complete, your iPhone will go through a check for various parameters – for example, your iPhone’s basic information, current software version, storage space, etc. This leads to preparing the update for your iPhone and all of its specific details and configurations. Therefore, this stage is called ‘Preparing Update’. The exact duration to complete this stage depends upon the size of the update. For minor updates and patches, the time to prepare the update is usually short. However, for a major version update that is quite large, the Preparing Update stage might take quite some time to process. If you have waited for some time and you just cannot bypass this stage, take a look at some of the methods to fix the issue.
iOS 16 Stuck on Preparing Update: 5 Easy Ways to Fix it
If you are updating to the latest version of iOS 16 – say the recently released iOS 16.5 and are unable to move past the ‘Preparing Update’ stage, here’s how you can troubleshoot and resolve the issue.
1. Delete and Re-Download the Update File
The downloaded update file on your iPhone may be corrupt. While this is ideally not expected to happen, if your iPhone is stuck at ‘Preparing Update’ for a long time, there is certainly some issue with the update file. Therefore, you can try deleting the update file and downloading it again to see if your iPhone can update without a problem. Step 1: Open the Settings app, and select General. Step 2: Open iPhone storage. Scroll down to find Software Update, tap on it, and delete the update file. Once the update file is deleted, you can download the update and try installing it again.
2. Check iPhone Storage
You need to ensure that your iPhone has enough remaining storage space to accommodate and install the downloaded update file. Therefore if you are running low on storage, chances are that you might have some problems while trying to update your iPhone. Step 1: Open the Settings app and select General. Step 2: Tap on iPhone Storage. Check if you have enough storage space left. Step 3: If not, clear your storage space. Tip: You can check out a guide to help delete the ‘Others’ storage section on your iPhone.
3. Check the Network Connection
The process of getting an update file ready for installation on your iPhone certainly requires an internet connection. Therefore, make sure that you connect to a Wi-Fi network that has good speed and good network strength. However, if you are downloading an update using cellular data, make sure that you have an active mobile data plan.
4. Restart iPhone
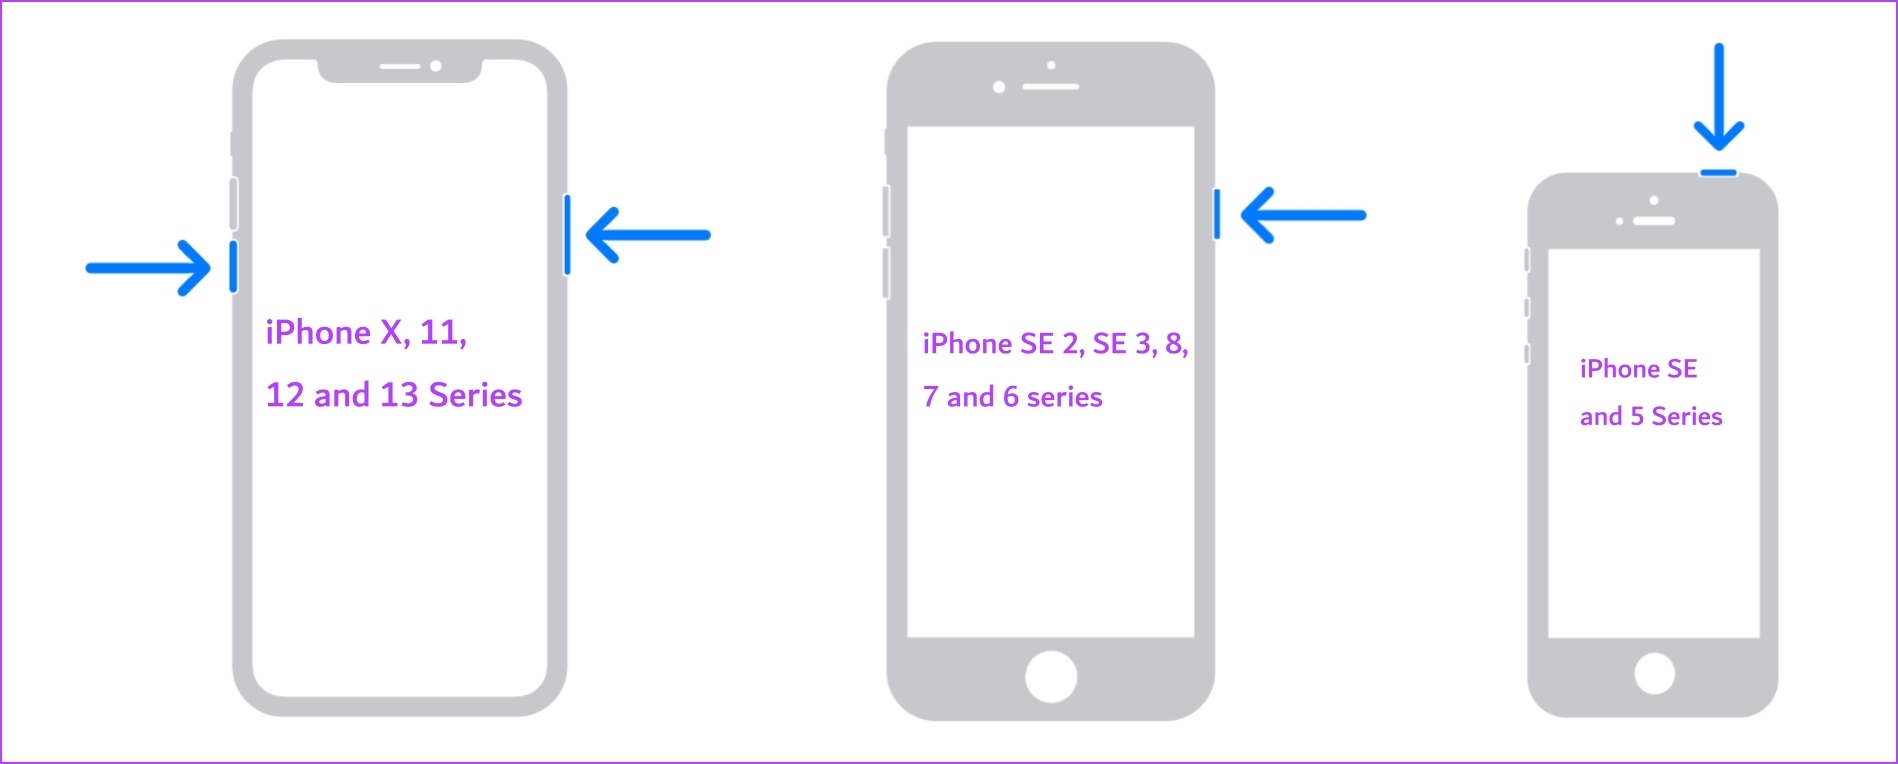
If your iPhone is unable to bypass the ‘Preparing Update’ stage for a long time, try restarting your iPhone. The update process might be affected by a bug that is running in the current session. Once you turn off your iPhone, it closes all the elements and operations including the bug. Once you turn your iPhone on, the chances of the bug restarting are slim. You can try updating your iPhone without any issues. Therefore, restarting your iPhone will help you fix the issue. Step 1: First, shut down your device.
On iPhone X and above Press and hold the volume down and the side button. On iPhone SE 2nd or 3rd gen, 7, and 8 series: Press and hold the side button. On iPhone SE 1st gen, 5s, 5c, or 5: Hold the power button at the top. On iPad: Hold the power button at the top.
Step 2: Now, drag the power slider to turn off the device. Step 3: Next, turn on your device by pressing and holding the power button on your iPhone.
5. Reset iPhone
If none of the above methods work, try resetting your iPhone. This process resets all the configurations and settings to their default states. Therefore, if any misconfiguration is affecting the iOS update process, resetting your iPhone will help you correct it. Step 1: Open the Settings app and tap on General. Step 2: Select ‘Transfer or Reset iPhone’. Step 3: Tap on Reset. Step 4: Tap on ‘Reset All Settings’ to return all configurations to their default state. This will most probably fix this issue. Those are all the methods you can implement if your iPhone is not able to move from the ‘Preparing Update’ stage and it is taking forever. However, if you have access to a Windows PC with iTunes or a Mac, you can easily update your iPhone. Here’s how.
6. Update iPhone Using iTunes or Mac
If you are facing issues updating iOS on your iPhone, you can try using your PC/Mac to do the same. All you need to do is to connect your iPhone with the lightning cable to your PC or Mac, and you’re just a few clicks away from completing the process. Here’s how to do it.
Update iPhone Using iTunes
Step 1: Download and install iTunes from Microsoft Store using the below link. Download iTunes Step 2: Install and open iTunes on your PC. Next, connect your iPhone using the lightning cable. Step 3: Now, your iPhone should appear on the sidebar. Select your device and click on Summary. Step 4: Click on ‘Check for Update’. This will tell you if an update is available for your iPhone and will let you update it using iTunes itself.
Update iPhone Using Mac
Step 1: Connect the iPhone to your Mac using the lightning cable. Step 2: In the list of devices, select your iPhone. Step 3: Now, select ‘Check for Update’. If there is any available iOS update, go ahead and install it.
Smoothly Update to the Latest iOS Version
We hope this guide helped you bypass the ‘Preparing Update’ stage on your iPhone. However, you may end up assuming that your iPhone is stuck at this stage but if it is downloading a major update or an update that is large in size, the process may take a significant amount of time. Further, if you are using an older iPhone, its age can be a contributing factor for the same. The above article may contain affiliate links which help support Guiding Tech. However, it does not affect our editorial integrity. The content remains unbiased and authentic.


