If you face a similar issue and can’t use the Windows Subsystem for Android successfully, don’t worry. The issue can arise due to missing Virtualization and Windows features, meddling anti-virus programs, or a recent Windows update. We will list multiple methods to get the app working again. Before you begin, make sure your computer runs the latest version of the app. Get Windows Subsystem for Android
1. Terminate and Restart Windows Subsytem for Android
Windows Subsystem for Android and its related processes can encounter a glitch and stop working properly. To fix this, you need to terminate Windows Subsystem for Android and its related processes and restart it. Here’s how to do it using the Settings app. Step 1: Press the Windows key + I to launch the Settings App. Step 2: Select App from the left sidebar and click on the Installed apps option from the right pane.
Step 3: On the Installed Apps page, locate the Windows Subsystem for the Android app. Click on the three vertical dots and select the Advanced options.
Step 4: Lastly, scroll down and click on the Terminate button. Close the Settings app.
2. Enable Hardware Virtualization on Your System
Windows Subsystem for Android needs hardware virtualization to work. If you haven’t enabled virtualization on your Windows system, it won’t be able to run Windows Subsystem for Android. Here’s how to enable hardware virtualization: Step 1: Press the Alt key + F4 to open the ‘Shut Down Windows’ utility. Select the Restart option from the list and click on the OK button.
Step 2: When your computer restarts, press the designated Function key (in our case it is the F2 key) repeatedly to enter the BIOS settings. Step 3: In BIOS settings, switch to the Advanced Settings page. The BIOS settings on your computer may be appear different. Step 4: Enable the Virtualization Technology option (SVM mode) and press F10 to save changes and exit the BIOS settings.
Wait for your system to restart and boot to the desktop. Try to run Windows Subsystem for Android and check if it works now.
3. Turn on All Windows Features Required for Windows Subsystem for Android
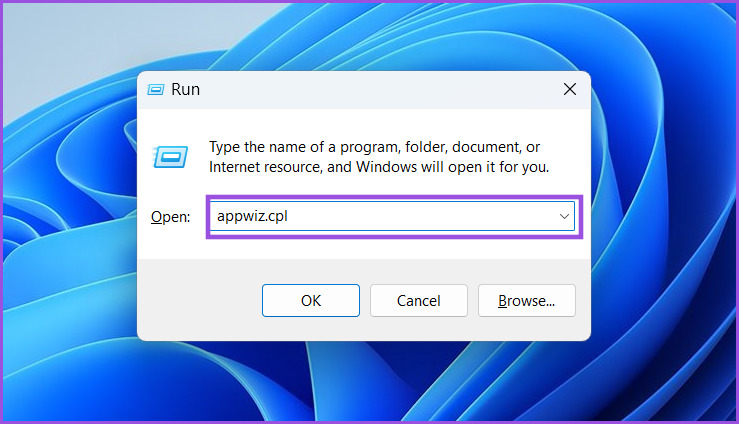
Apart from hardware virtualization, Windows Subsystem for Android needs the Virtual Machine Platform feature to work properly. If it is disabled on your system, the Windows Subsystem for Android app will throw an error and won’t run. Here’s how to enable the feature: Step 1: Press the Windows key + R to open the Run dialog box. Type appwiz.cpl and press Enter.
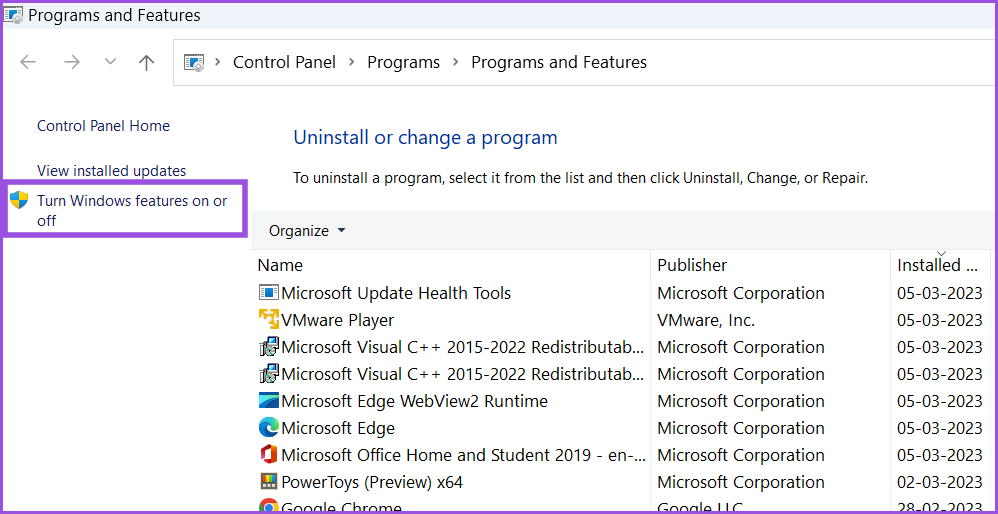
Step 2: The Programs and Features window will launch with the Control Panel. Click on the ‘Turn Windows Features on or off’ option in the left sidebar. You’ll need administrator privileges to use this feature.
Step 3: Scroll down the list of available Windows Features and locate the ‘Virtual Machine Platform’ feature. Click on the checkbox next to it and then click on the OK button.
Step 4: You will see a prompt to restart Windows. Click on the Restart now button.
Windows will restart and install the Virtual Machine Platform feature on your system.
4. Uninstall a Third-Party Hypervisor App
A third-party Hypervisor app can conflict with Windows Subsystem for Android. So, it is best to uninstall it and then attempt to run Windows Subsystem for Android on your system. Don’t worry, your virtual machines will stay intact; you can install the Hypervisor app again. Repeat the following steps: Step 1: Press the Windows key + S to open Windows Search. Type appwiz.cpl and press Enter.
Step 2: On the Program and Features page, locate the hypervisor app in the list of installed apps. Right-click on it and select the Uninstall option from the context menu.
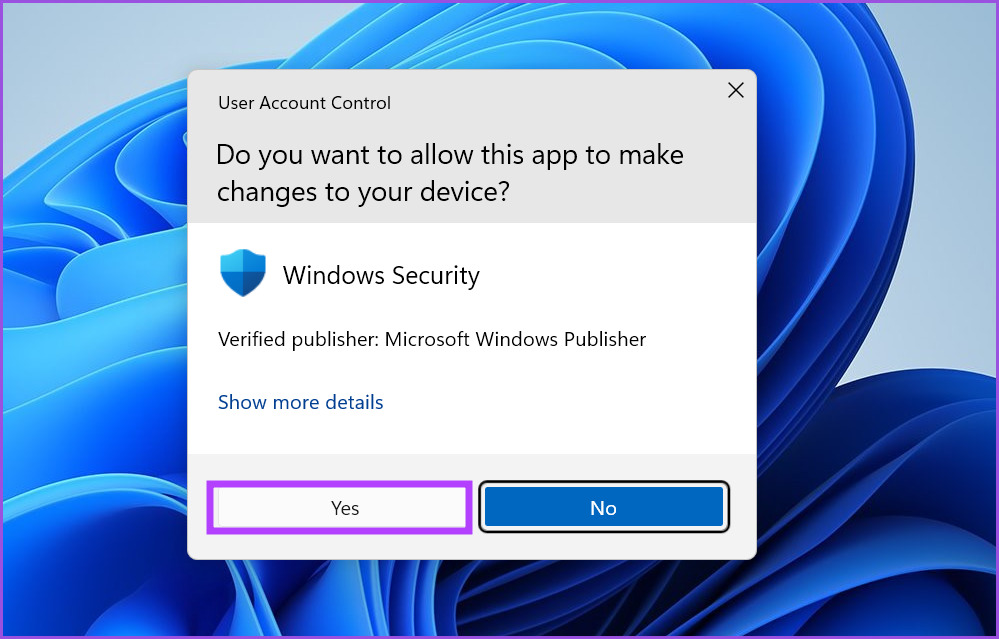
Step 3: User Account Control prompt will pop up. Click on the Yes button to begin the uninstallation.
Step 4: After the program uninstalls, restart your system and attempt to launch Windows Subsystem for Android.
5. Temporarily Disable Windows Defender
Windows Defender can block apps from running and accessing system components. To rule out this issue, disable Windows Defender temporarily and then run Windows Subsystem for Android. Step 1: Launch the Start menu, type Windows Security, and click Open.
Step 2: Click on the ‘Virus & threat protection’ icon.
Step 3: Scroll down and locate the ‘Virus & threat protection settings’ section. Click on the Manage Settings option.
Step 4: Turn off the toggle for Real-time protection to disable it.
Step 5: The User Account Control prompt will pop up and click on the Yes button to confirm your decision.
If you have a third-party anti-virus program on your computer, access its settings page and disable it until the next boot.
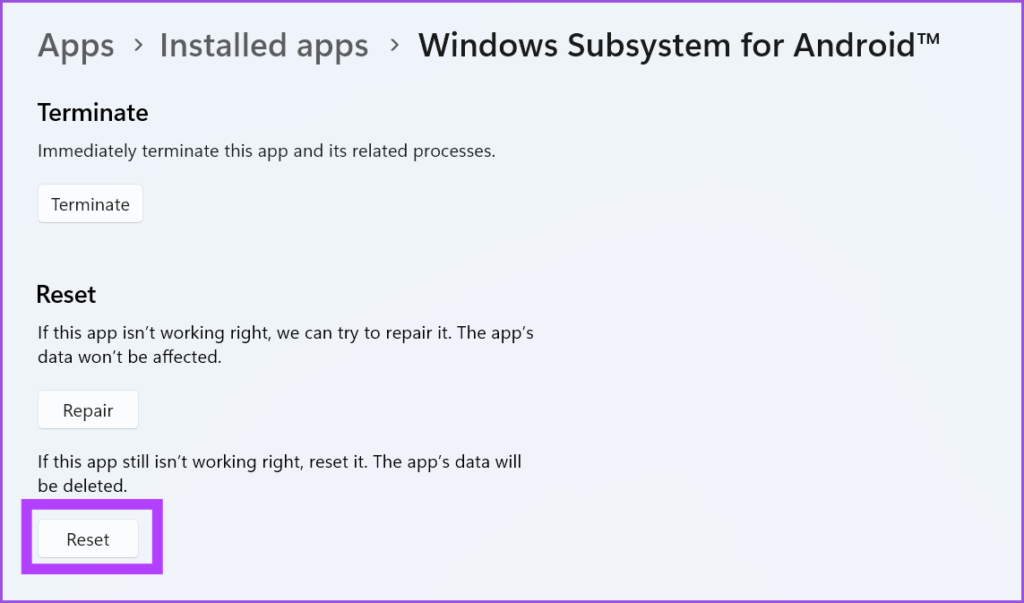
6. Repair or Reset the Windows Subsystem for Android App
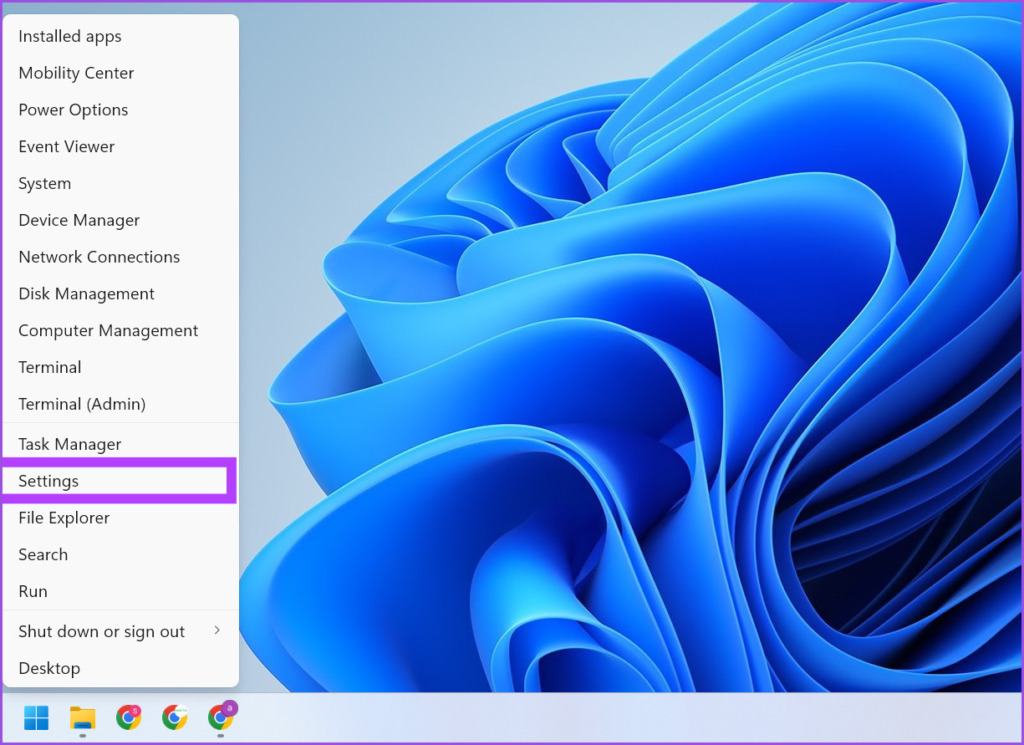
Windows offers the option to repair a Microsoft Store app. If something is wrong with the app installation, you can use the repair option to fix it. Step 1: Right-click on the Start button to launch the Power User menu. Select the Installed Apps option.
Step 2: Locate the Windows Subsystem for Android app and click on the three horizontal dots to open the context menu. Select the Advanced options from the list.
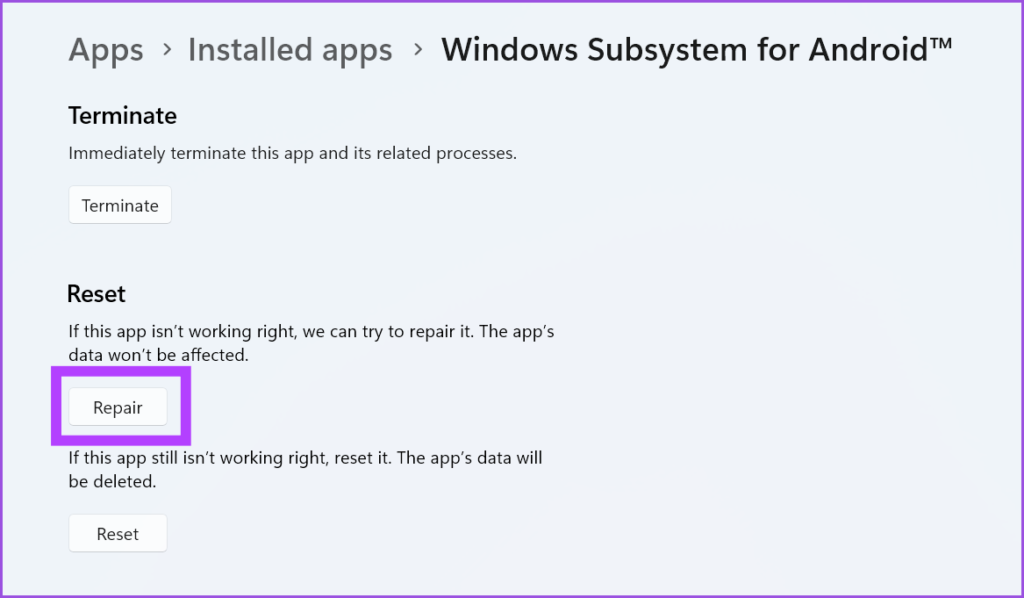
Step 3: On the Advanced options page, scroll down to the Reset section and click on the Repair button.
Step 4: If the app repair doesn’t fix the issue, you must Reset the app. Make note that you will lose all the app data and will have to sign in again. On the same page, click on the Reset button.
7. Rollback Windows Update
New Windows updates can sometimes break apps and system features. If the Windows Subsystem for Android app worked fine before and encounters problems after a recent automatic Windows update, you’ll need to roll back the update. Here’s how: Step 1: Right-click on the Start button and select the Settings option from the Power User menu.
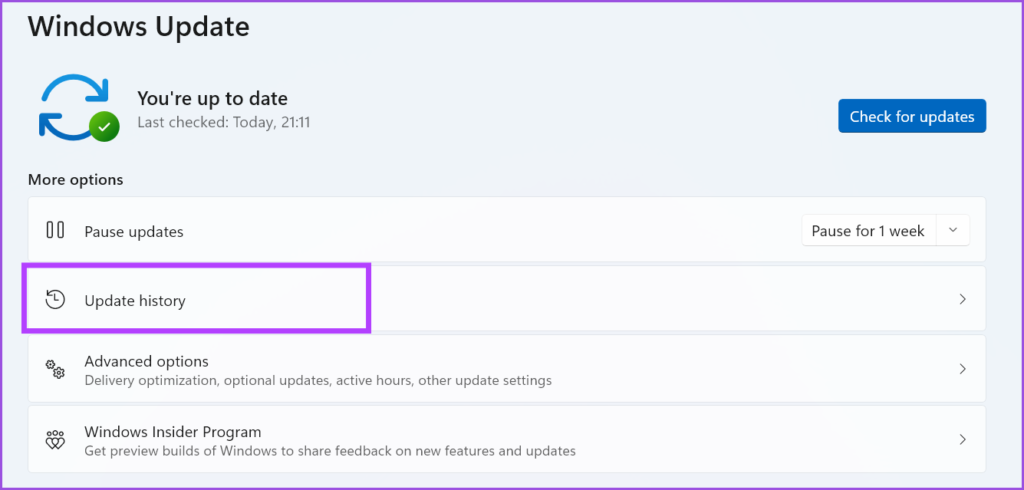
Step 2: After that, Click on the Windows Update icon at the top-right corner.
Step 3: Click on the Update history option.
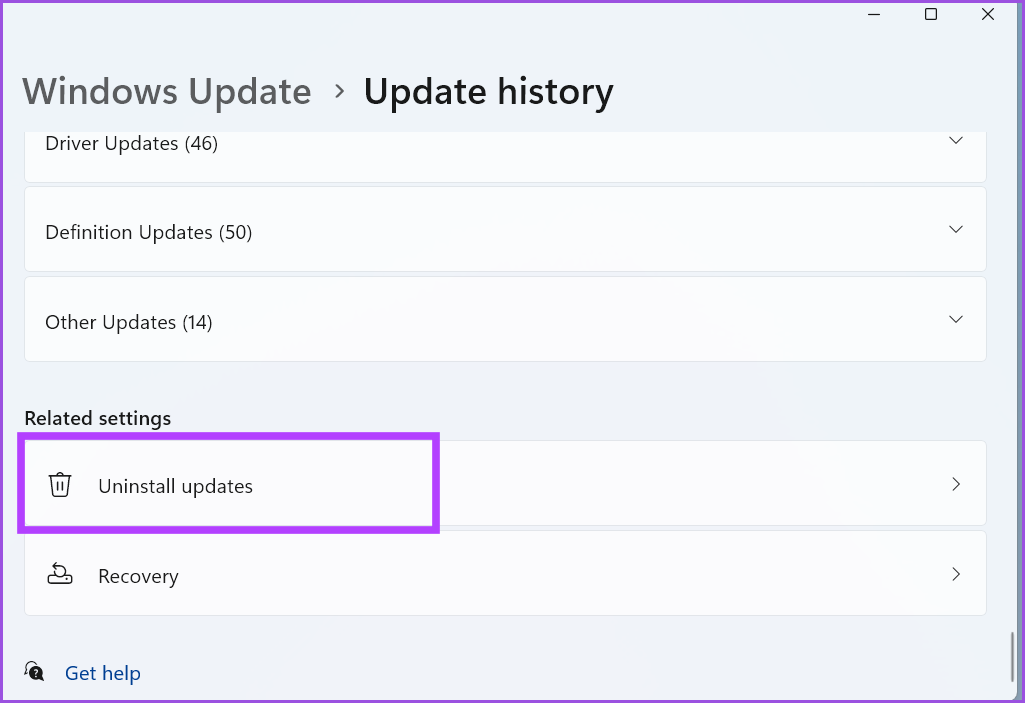
Step 4: Under the Related settings section, click on the Uninstall updates option.
Step 5: Locate the most recently installed update from the list and click on the Uninstall option.
Step 6: Lastly, click on the Uninstall button to confirm your action.
Windows will remove the update from your system.
Run Android Apps on Windows Without Issues
Windows Subsystem for Android made running Android Apps on Windows 11 possible. The app library is limited, but you can sideload apps from other sources. Moreover, ensure that your system has hardware virtualization active and all the necessary Windows features installed. The above article may contain affiliate links which help support Guiding Tech. However, it does not affect our editorial integrity. The content remains unbiased and authentic.