There’s no need to strain your eyes if you have trouble reading elements on a website. This guide will show you how to set the default zoom level in Google Chrome for your PC or Mac, along with other useful tips. So, let’s take a look.
How to Change the Default Zoom Level in Google Chrome
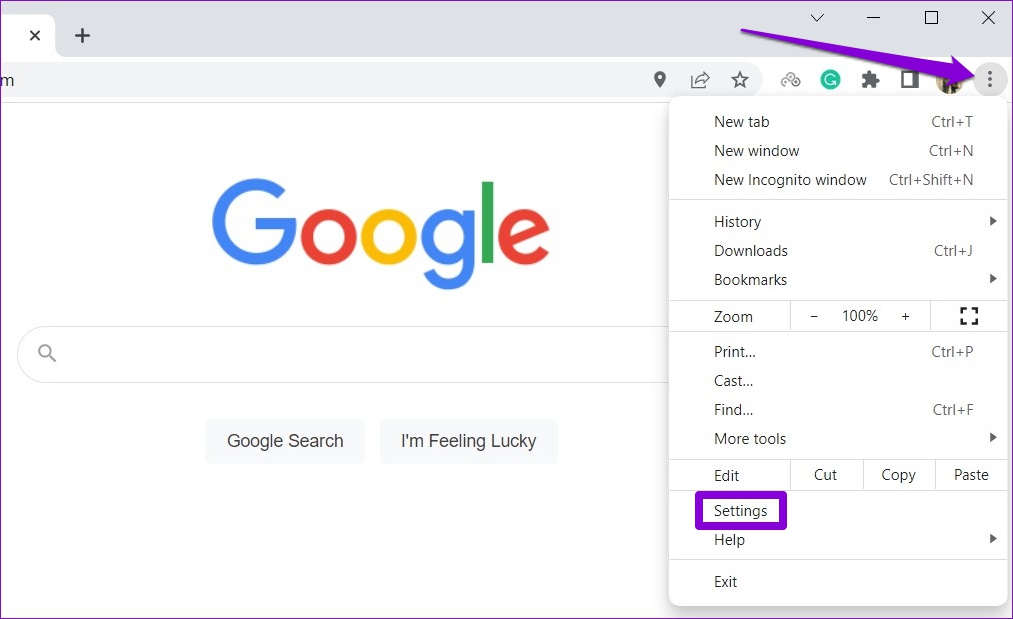
The default zoom level of 100% in Google Chrome may not be ideal for everyone. The good news is that it’s fairly simple to adjust the default zoom level in Chrome and improve your browsing experience. Here’s how to do it. Step 1: Open Google Chrome on your computer. Click the three vertical dots menu icon at the top-right corner and select Settings from the context menu. Step 2: Select the Appearance tab from the left pane. Step 3: Click the drop-down menu next to Page zoom and select your preferred value from the list. Your default zoom level will be applied to all websites unless specified otherwise.
How to Set Zoom Level for a Specific Website in Google Chrome
Since websites have different designs, the default zoom level you set in Chrome may not work well for all of them. To enhance your browsing experience on your favorite websites, you can set a different zoom level based on your requirements. To set a custom zoom level for a website in Chrome, use these steps: Step 1: Open Google Chrome and head over to the website where you want to set the zoom level. Step 2: Click the menu icon (three vertical dots) in the top right corner and use the plus (+) or minus (-) button next to Zoom to zoom in or out, respectively. Alternatively, press and hold the Ctrl (Windows) or Cmd (Mac) key and scroll in or out with your mouse to change the zoom level. Google Chrome will save your preferences for that website. You can repeat the above steps to set different zoom levels for different websites.
How to Reset Zoom Level for Websites in Google Chrome
In Google Chrome, you can reset any custom zoom levels set for various websites. This will allow the browser to load those websites with the default zoom level. To reset the zoom level for websites in Chrome, use these steps: Step 1: Open Google Chrome on your computer. Click the menu icon at the top-right corner and select Settings. Step 2: Switch to the Privacy and security tab. Step 4: Click on Site Settings. Step 5: Scroll down to the Content section and click on Additional content settings to expand it. Step 6: Click on Zoom levels. Step 7: In this section, you will find a list of websites for which you have set a custom zoom level. Click the X icon next to a website to delete the zoom settings.
Bonus: How to Change the Font Size in Google Chrome
Increasing or decreasing the zoom level for a website affects all the page elements, including text, images, and videos. However, this can sometimes result in text that is either too large or too small. To avoid this, you can change the default font size in Chrome. This will allow Chrome to change only the text size on websites without affecting the size of other visual elements. To modify the font size in Google Chrome: Step 1: Open Google Chrome on your computer. Click the three vertical dots menu icon at the top-right corner and select Settings from the context menu. Step 2: Select the Appearance tab from the left pane. Step 3: Click the drop-down menu next to Font size and select from the available options: Very small, Small, Medium, Large, or Very large. Note that some websites don’t allow browsers to adjust the text size alone, so the above changes won’t affect those sites. In that case, you’ll need to set a custom zoom level to optimize your browsing experience.
Zoom Your Way to Better Browsing
By adjusting the zoom level to suit your preferences, you can make browsing more comfortable. That said, if you use Chrome primarily to read content, you can take advantage of the reader mode to declutter pages and focus on what matters. The above article may contain affiliate links which help support Guiding Tech. However, it does not affect our editorial integrity. The content remains unbiased and authentic.


