Usually, you would think of relying on a third-party app or website to convert your image file into a PDF. But what if we told you that the Preview app can do that on your Mac? Yes, it can. This post will show how to convert your JPG files into PDFs using the Preview app on Mac.
Before Getting Started
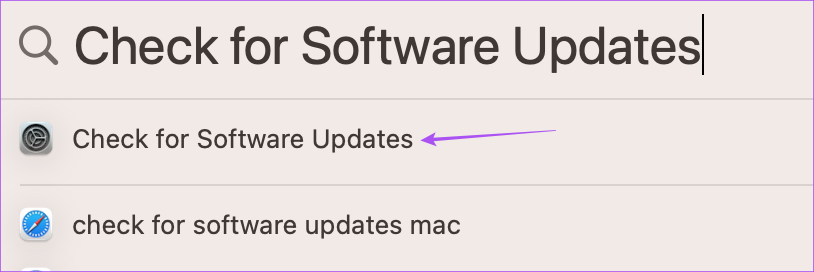
At times, the older version of macOS often results in running older version of the apps too. That means, it’s recommended that you upgrade the macOS version. For that, you’ll need to install any pending updates and after that Preview app will work like a charm. That’ll help when you need to convert large images into PDFs. So here’s how you can fetch macOS updates on your Mac. Step 1: Press Command + Spacebar to open Spotlight Search, type Check For Software Updates, and press Return.
Step 2: If there’s an update available, download and install it. Let’s proceed on how to convert a JPG image file to a PDF on your Mac using the Preview app.
How to Convert JPG to PDF on Mac
Preview is a versatile app which appears like a humble image viewer on Mac. Undoubtedly, Apple has quietly added several features in the app. So first you’ll need to ensure that the app works fine. You may refer to our post for fixes when Preview app isn’t working on Mac. After you’ve got it working, here’s what you need to do: Step 1: Browse the image file on your Mac using the Finder and double-click on the image file to open it in Preview. By default, macOS opens all image files in Preview. But, if you have selected a different app as the default, right-click on the image file icon, select Open With, and choose Preview from the submenu.
Step 2: When the image opens in the Preview app, click on File option at the top-left corner on the menu.
Step 3: Select ‘Export As PDF’ from the context menu.
Step 4: Type the name of your PDF file and select the file location on your Mac.
Step 5: Click on Show Details.
Step 5: Select the Paper Size and Orientation of your PDF file.
Step 6: After selecting your preferences, click on Save to convert.
Preview will save the orientation and paper size preferences to save your JPG file as a PDF on your Mac. After that, you may navigate to the location where the PDF file is saved and open it again using Preview app. But what if you want to make this PDF file more secure? Read on.
How to Add Password to PDF File on Mac
Simply converting an image to a PDF is only half the battle. The real challenge is to keep the content of the file away from the prying eyes. Luckily, the Preview app is capable enough to let you add a password to your PDF file. Here’s how to do that. Step 1: Open the image in the Preview app. Step 2: Click on File at the top-left corner.
Step 3: Select Export As PDF.
Step 4: Click on Show Details.
Step 5: Click on Permissions.
Step 6: Click the checkbox next to ‘Require Password to Open Document.’
Step 7: Enter your password and re-enter to confirm it. You can also select different permissions for your PDF file that be accessed only after entering the password.
Step 8: Enter the Owner Password and re-enter it to verify.
Step 9: Click on Apply at the bottom-right side.
Step 10: Click on Save.
How To Convert Image Files Into a Single PDF
If you have a lot of image files that you want to add into a single PDF file, here’s how to do the same using Preview app on your Mac. Step 1: Select all your image files. Step 2: Double-click to open them in Preview. You’ll need the thumbnail view bar on the left hand side. You can click on a thumnail of an image and drag it upwards or down to rearrange them in you want them to appear in the PDF file.
You can click on Rotate at the top right side to adjust the orientation of every image file.
Step 3: Click on File at the top-left corner.
Step 4: Select Print.
Step 5: Under Page, select All. Alternatively, you can also select the pages (the actual images) in Preview’s thumbnail bar or assign a numeric range for the imagess.
Step 6: Click on the PDF drop-down menu at the bottom.
Step 7: Select Save As PDF.
Step 8: Assign the name and location of your PDF file. You can add a password to your PDF file by clicking the Security Options button.
Step 9: After you select your preferences, click on Save at the bottom-right side.
The Preview app will convert all your selected images into a single PDF file. If you have multiple images of a document, you can create a single PDF file of that document and sign it using Adobe Acrobat Reader on your Mac.
Convert JPG to PDF for Free
These steps will help you convert all your JPG or JPEG files into PDFs on your Mac without installing a third-party app or uploading the files on a website. Using the Photos app, you can also convert your photos into PDF files on your iPhone. Since PDFs have wider compatibility, sharing your photos with your contacts is easier for various purposes. Plus, PDFs are smaller in size compared to JPG or HEIC image files. The above article may contain affiliate links which help support Guiding Tech. However, it does not affect our editorial integrity. The content remains unbiased and authentic.

