You can create and use a recovery drive to boot to the Windows Recovery Environment (WinRE) and then access the troubleshooting options. We will elaborate on creating and using the recovery drive on your Windows 11 PC. Let’s begin.
How to Create a Windows 11 USB Recovery Drive
Microsoft bundles the Recovery Drive app in Windows 11 to help you create a recovery disk. You can use any USB drive, but Microsoft recommends a minimum storage capacity of 16 GB. But before creating a recovery drive, back up all the data on the USB drive to your computer or another external drive. Repeat the following steps to create a Windows 11 recovery drive: Step 1: Plug in the bootable USB recovery drive to your Windows computer. Step 2: Press the Windows key to open the Start menu, type Recovery Drive in the search bar, and click on the Open option. Step 3: The User Account Control window will pop up. Click on the Yes button to launch the tool. Step 4: Select the ‘Back up system files to the recovery drive’ checkbox and click on the Next button. It can take time to list all the available drives on your system. Step 5: The tool will list the available USB drives on your system and notify you about the capacity of the USB drive you will need for it. Select the correct one and click on the Next button. Step 6: You will see a warning about deleting all the data present on the selected USB drive. Click on the Create button. Step 7: Patiently wait for the process to complete. After that, click on the Finish button to close the Recovery Drive window.
How to Use a USB Recovery Drive in Windows 11
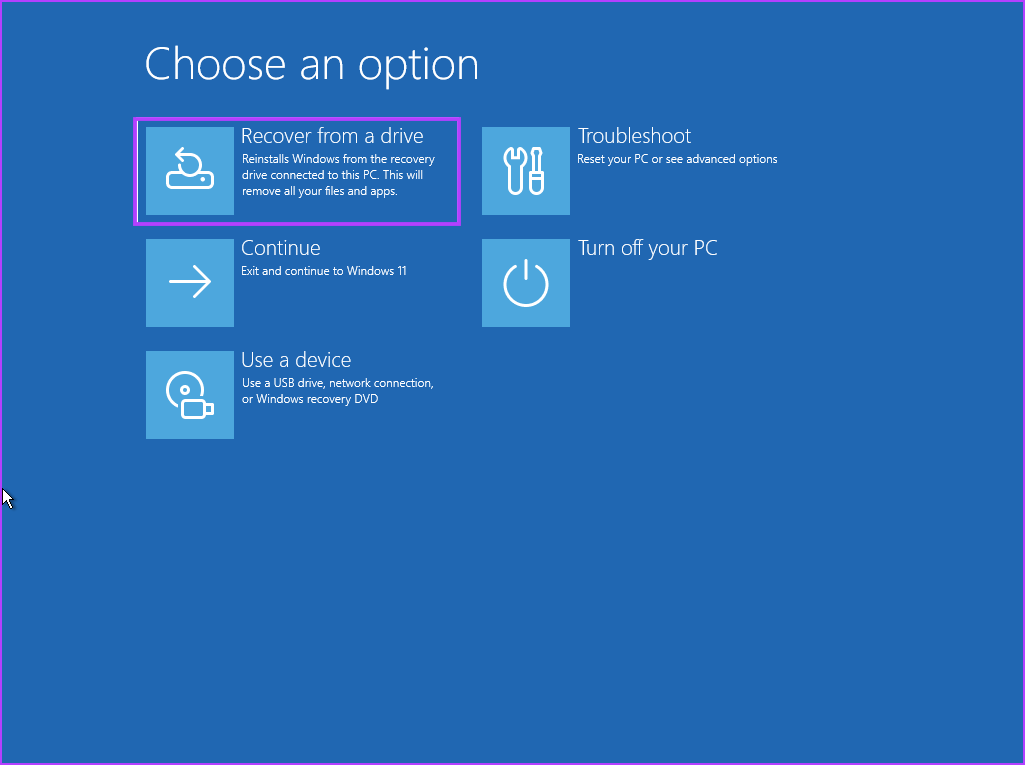
When your Windows PC cannot start normally, and you cannot access the lock screen or boot to the desktop, a recovery drive can be very useful. You can boot from the USB drive and access the Windows Recovery Environment, which offers multiple tools to fix a Windows installation. However, make sure that you try out all the tools in the Advanced Options section before bravely wiping everything on the C drive and losing all your files. Here’s how to use a USB recovery drive: Step 1: Plug the recovery drive into the computer. Step 2: Power on the computer and repeatedly press the designated F-key or Esc key to enter the boot devices menu. Remember that the F-keys to access BIOS and boot devices menu vary with each OEM. So, check the correct F-key for your system beforehand. Step 3: After the boot devices menu launches, use the arrow keys to select the recovery drive. Press Enter to boot using the recovery drive. Step 4: Wait for a few minutes for the USB drive to boot to the Language selection page. Click on a language to select it. Step 5: On the Choose an option page, click the Troubleshoot option. Step 6: Try out Startup Repair, Uninstall Updates, System Restore, and other available tools to fix your system. Step 7: If all these efforts end in despair, click on the Back button. Now, click on the ‘Recover from a drive’ option. Step 8: Click on the ‘Just remove my files’ option. Step 9: Lastly, click on the Recover button and follow the on-screen instructions to reinstall Windows. After the Windows 11 reinstallation completes, you will have to set up your preferences (language, region, security, and tracking) like you do when you do a clean install.
Always Have a Recovery Disk Nearby
Windows Recovery Drive can help you access the Windows Recovery Environment page and try multiple troubleshooting techniques. Reinstalling Windows 11 using the Recovery Drive should be the last option on your list because it will wipe everything. The above article may contain affiliate links which help support Guiding Tech. However, it does not affect our editorial integrity. The content remains unbiased and authentic.