Setting up an Android phone or tablet to mirror its screen to a Windows 11 PC is quite simple. But doing the same on Windows 11 computer is a bit tricky. You’ll need to check and confirm a few things before you begin. We will show you how to mirror your Android phone onto your Windows 11 PC so you can easily share content from your phone or tablet on a larger screen.
Installing and Enabling the Wireless Display Feature
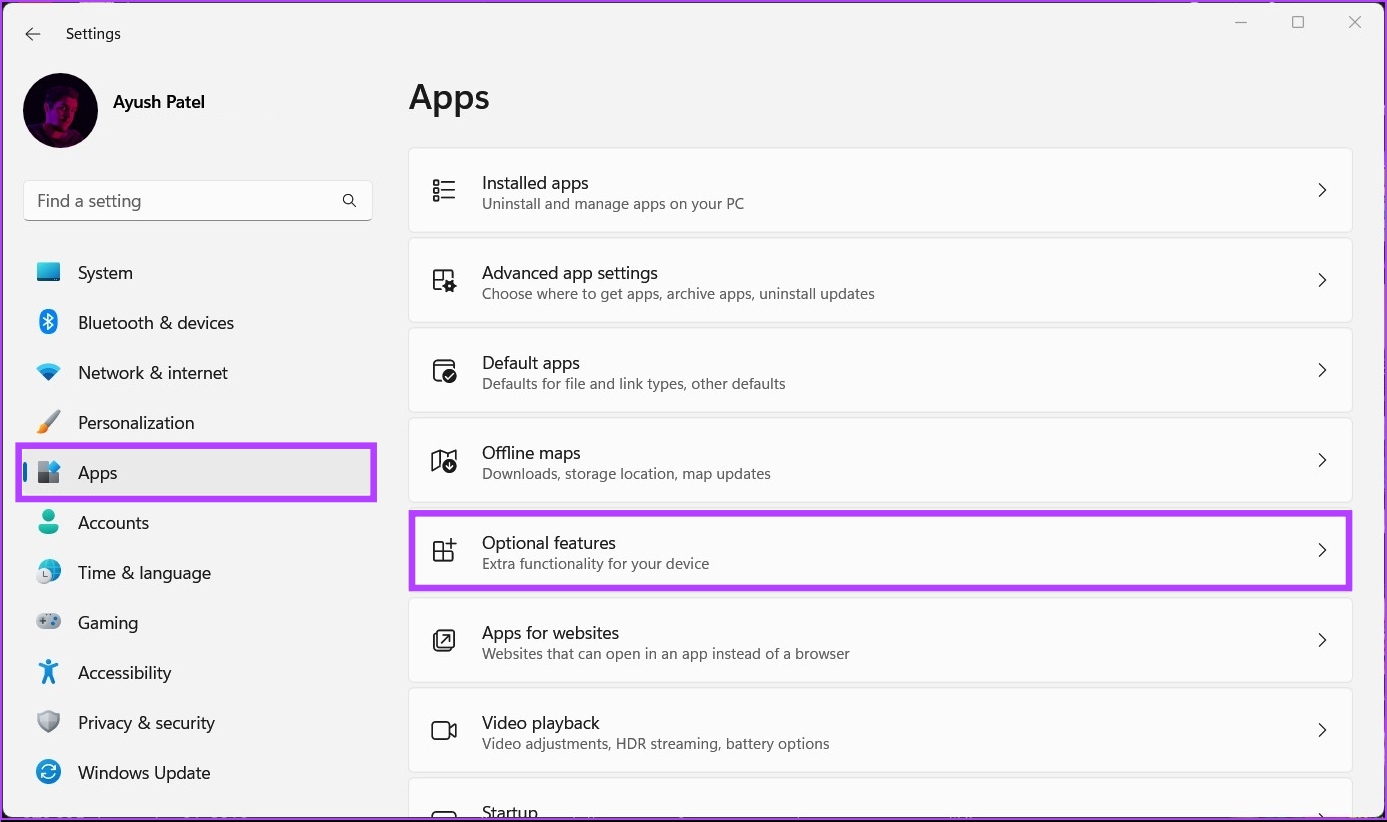
Beyond ensuring your Windows 11 PC is Miracast compatible, the first step towards mirroring your Android smartphone to your Windows 11 PC includes enabling the Wireless Display feature. In Windows 11, you might need to download optional packages and install it to enable the feature. Here’s how you can easily install and enable the wireless display feature on your Windows 11 PC: Step 1: Use the Windows + I shortcut to open the Settings app. Step 2: Inside the Settings app, click on the Apps in the left column. From the right pane, click on Optional features.
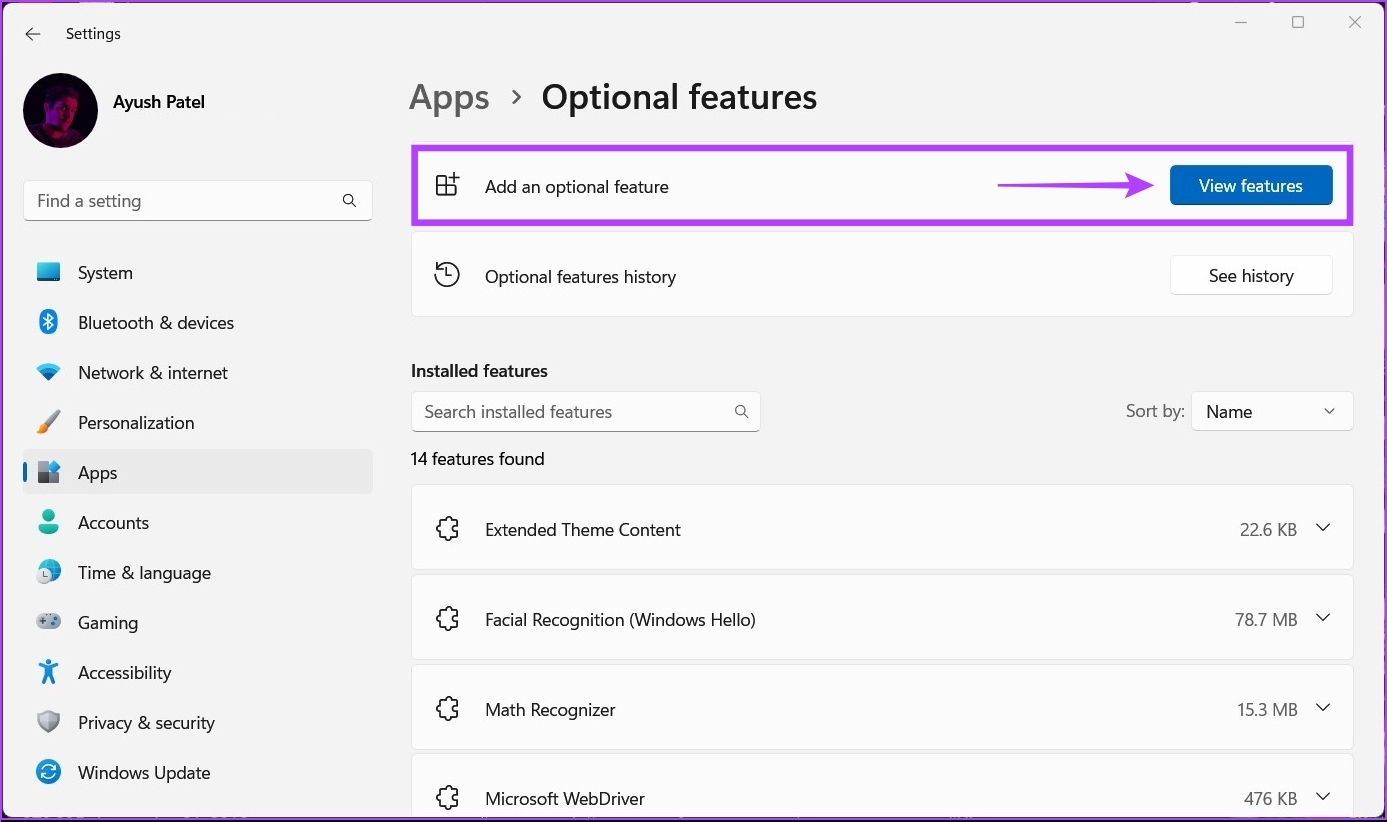
Step 3: Click on the ‘View features’ button on the right-hand side of the ‘Add an optional feature’ section.
Step 4: Scroll down to the Wireless Display option, select the check box beside it, and click the Next button.
Step 5: On the following screen, click the Install button.
After that, Windows 11 will automatically download and install the necessary files for enabling the Wireless Display feature on your computer.
After installing and enabling Wireless Display on your Windows 11 PC, you may proceed to set up the screen mirroring from your Android phone.
Mirroring Android Devices to Windows 11
To cast or mirror an Android smartphone to your PC, you will need to ensure that both devices are appropriately configured and connected to the same Wi-Fi network to communicate without any hitch.
Configuring Your Windows 11 PC
After installing the Wireless Display optional feature, you’re ready to accept the mirroring requests from an Android phone. Here’s how you can prepare your Windows 11 PC for screen mirroring: Step 1: Use the Windows + I shortcut to open the Settings app. Then, scroll down and click on the ‘Projecting to this PC’ option.
Step 2: Under projecting to this PC, click on one drop-down at a time and ensure that you select all the options that are selected in the screenshot below:
Step 3: Click on the ‘Launch the Wireless Display app to project to this PC’ option. Furthermore, if you’re trying to use the Wireless Display feature on a laptop, you will need to turn off the ‘This PC can be discovered for projection only when it’s plugged into a power source’ toggle.
After that, you’ll see a blue Wireless Display window on your screen with the message, ‘Your PC’s Name is ready for you to connect wirelessly.’ Check the screenshot below for reference – while our screenshot says Acer because we took it from an Acer-made machine, the text on your PC might be different.
After you’ve configured and confirmed that Wireless Display works on your Windows 11 PC, let’s move to the Android phone to get things ready.
Configuring Your Android Device
Almost all Android phones have a Cast feature built inside, irrespective of the phone maker. So, it is pretty easy to configure your Android device for screen mirroring. Here’s how you can prepare any Android device for screen mirroring: Step 1: Open the Settings app on your Android device. You may choose a different way like, swiping down from the top of the screen to bring down the Notifications tray and tapping on the gear icon in the corner of it. Step 2: When the Setting app opens, tap on ‘Bluetooth & Device Connection.’ Note: The Settings app may look different on your Android phone depending on its make and Android version. Step 3: Under ‘Bluetooth & Device Connection,’ tap on the Cast option. Step 4: Under Cast, tap on the ‘Enable wireless display’ toggle to turn it on. Step 5: From the list of Nearby devices, tap on your PC’s name. That’ll open an ‘Invitation to connect’ dialog and you’ll need to enter the 8-digit PIN that you can find on your Windows 11 PC. Your Windows 11 PC will display an 8-digit security PIN, which will you’ll need for the next step.
Step 6: Enter the 8-digit PIN from your PC’s screen into the ‘Type the required PIN’ field on your Android device, then tap Accept. As soon as you tap on Accept, your Android phone’s interface should appear on your PC’s screen. Meanwhile, to end the screen mirroring session, you can close the Wireless Display app on your Windows 11 PC or tap on the quick settings toggle found on your Android device.
Enjoy Your Smartphone on A Bigger Screen
After following the steps mentioned above, you can mirror an Android smartphone onto your Windows 11 PC – provided both are Miracast compatible. However, if you aren’t able to get this feature up and running, make sure that your Smartphone and PC are connected to the same wireless network, and check our guide to fixing the wireless display feature on Windows 11. The above article may contain affiliate links which help support Guiding Tech. However, it does not affect our editorial integrity. The content remains unbiased and authentic.


