The Screen Time menu also includes a nifty feature called Downtime that lets you turn off all notifications and restrict you from using your device for a certain period. This post will outline all the details about Downtime and how to set it up on your iPhone, iPad, and Mac.
Set Up Downtime on iPhone and iPad
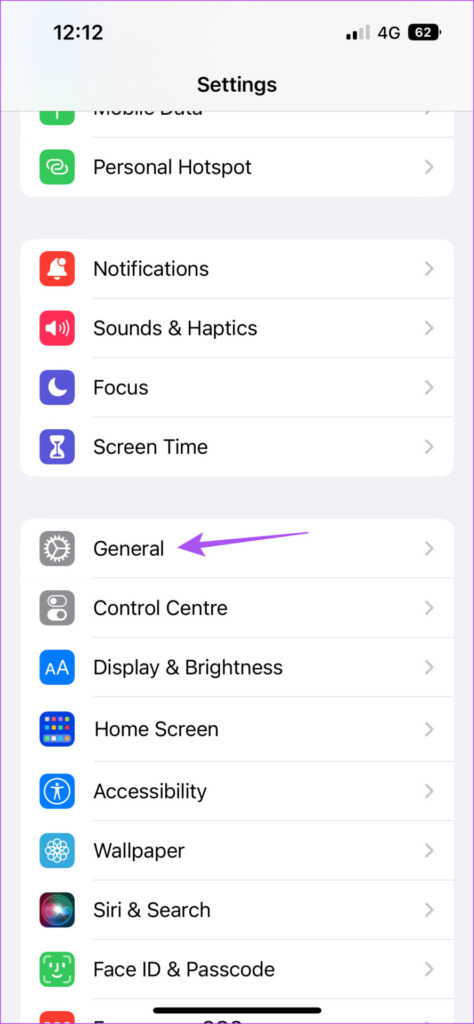
With the advent of social media, most users are concerned about the prolonged usage of apps on iPhone and iPad. You can block individual apps like YouTube on your iPhone or iPad. But when you are back from a busy day at work and do not wish to get bothered by notifications, you can schedule Downtime to get a good night’s sleep. Before moving ahead, we suggest updating to the latest software version on your iPhone or iPad. The steps remain the same for iPhone and iPad. Step 1: Open the Settings app on your iPhone or iPad.
Step 2: Tap on General.
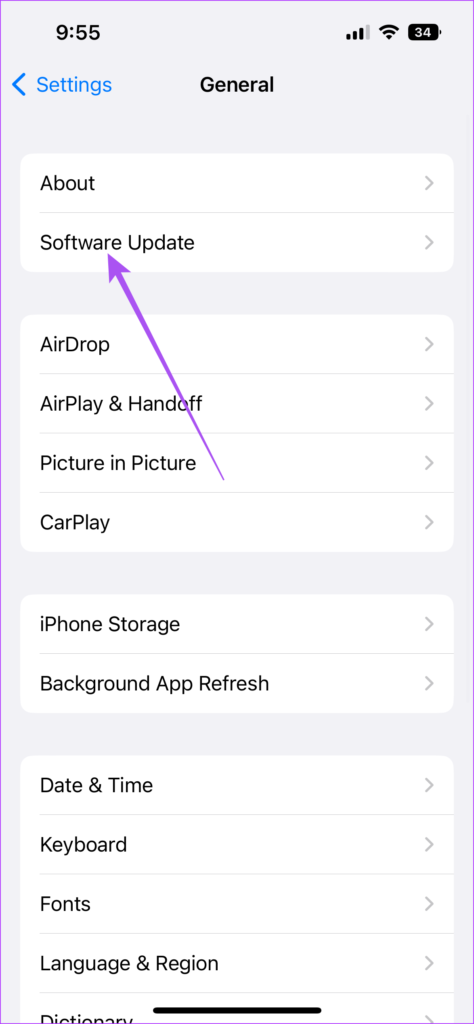
Step 3: Select Software Update.
Step 4: If there’s an update available, download and install it. After you install the update, your iPhone or iPad will restart. Here’s how you can set Downtime on your device. Step 1: Open the Settings app on your iPhone or iPad.
Step 2: Scroll down and tap on Screen Time.
Step 3: Tap on Downtime.
You can tap on Turn On Downtime Until Tomorrow to immediately restrict all notifications. The Downtime will start on your device 5 minutes later.
Tap the toggle next to Block at Downtime to block your device.
You can also schedule Downtime by tapping the toggle next to Scheduled.
After that, close Settings, and Downtime will activate on your iPhone or iPad based on your preference. Refer our post to exclude apps from Screen Time on your iPhone or iPad. You can select apps like Phone, Messages, and Clock to prevent them from Downtime.
How to Remove Downtime From An App
If you aren’t happy with setting downtime for 24 hours for certain apps, you can totally remove downtime for them. Here’s how you can remove Downtime from an app on your iPhone or iPad if you want to use it for some time. Step 1: Open the app on your iPhone or iPad. Step 2: Tap on Ask For More Time.
Step 3: You can either tap on One More Minute or Enter Screen Time Passcode.
If you enter the Screen Time passcode, you can choose to approve using the app for 15 minutes, 60 minutes, or for the entire day.
Set Up Downtime on Mac
The Screen Time feature on your Mac gives you the option to set Downtime and avoid notifications of emails, messages, and web browser notifications. To use Screen Time, ensure that you are using macOS 10.15 Catalina or above on your Mac. Here’s how to check and update the same. Step 1: Press Command + Spacebar shortcut to open Spotlight Search, type Check for Software Updates, and press Return.
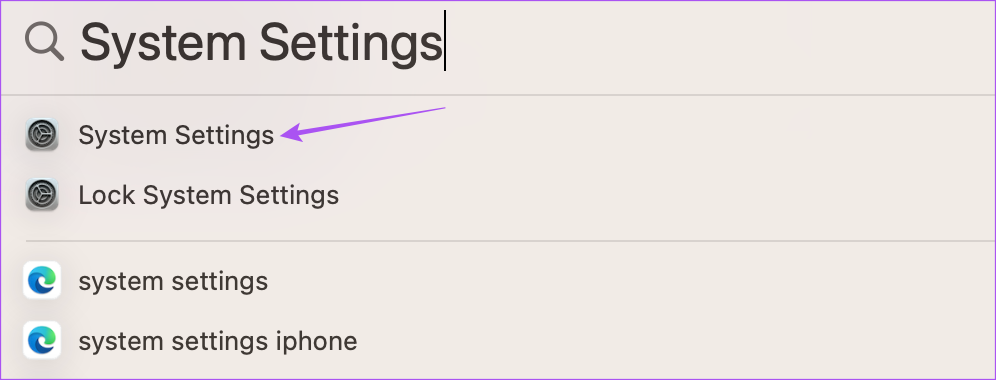
Step 2: If an update is available, download and install it. Aftert you install the software update, your Mac will restart. Here’s how to set up Downtime on your Mac. Step 1: Press Command + Spacebar shortcut to open Spotlight Search, type System Settings, and press Return.
Step 2: Click on Screen Time from the left sidebar.
Step 3: Click on Downtime.
Step 4: Turn off the toggle next to Downtime to disable all notifications.
You can also schedule Downtime on your Mac by clicking the drop-down menu next to Scheduled.
You can set the start and end time for Downtime on your Mac.
How to Turn Off Downtime for an App on Mac
If you’ve accidentally added an app that need not be affected with the Downtime, you can fix that. Here’s how to turn off Downtime for an app on your Mac. Step 1: Open the app on your Mac to remove Downtime. Step 2: Click on Ignore Limit.
Step 3: Select your time till which the limit will be ignored on that app.
Lights Out
Downtime is a great feature to limit how long you use your iPhone, iPad, or Mac regularly. The Screen Time data on your device makes you more aware of your usage by recording all your activities. But you can also reset the old Screen Time data to start tracking your usage with a definitive purpose. This will help you make a fresh start in taking charge of your time. The above article may contain affiliate links which help support Guiding Tech. However, it does not affect our editorial integrity. The content remains unbiased and authentic.