However, it is important to note that these Safari private browsing features may only prevent information from being stored on your iPhone. Information transmitted beyond your iPhone, on the other hand, may still be accessible. Here are the different ways to ensure private browsing in Safari on your iPhone.
How to Enable Safari’s Private Browsing Mode on iPhone
With Safari’s Private Browsing mode, the browser won’t save the websites you visit nor will it retain your personal details. Here’s how to enable the Private Browsing mode in Safari on iPhone: Step 1: Tap the Safari app from your iPhone home screen.
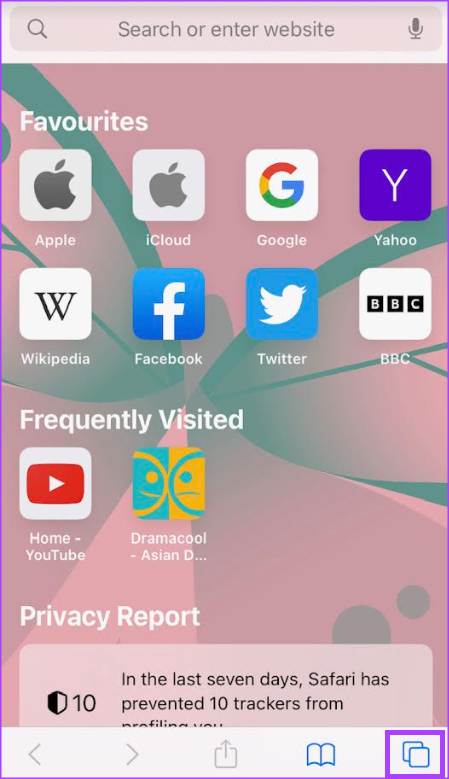
Step 2: Tap the Tabs button at the bottom-right corner of the Safari page.
Step 3: Tap the [number] Tab downward arrow or Start Page downward arrow in the middle of the page.
Step 4: On the Tab Groups list, tap the Private option.
Step 5: Tap Done.
How to Monitor and Prevent Trackers With Safari’s Privacy Report
Safari produces a Privacy Report, which provides a summary of trackers that were encountered and prevented while you were browsing. iPhone users can rely on this report to review and adjust Safari settings to keep their browsing private. However, in Private Browsing mode, Safari will not keep these statistics. To have the Privacy Report, you must use the normal browsing mode. Here’s how to view your Privacy Report. Step 1: Tap the Safari app from your iPhone home screen.
Step 2: On the Safari Start Page, there should be a section for the Privacy Report. Step 3: Tap the report summary to view the full details.
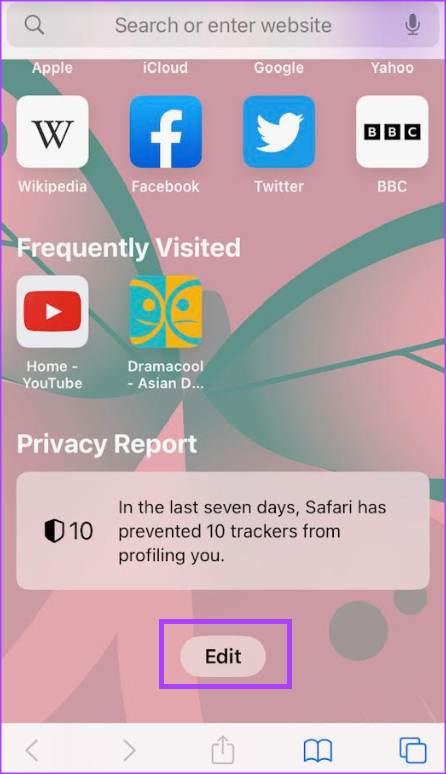
If you cannot see the Privacy Report on your start page, you may need to edit your start page. Here’s how to do so: Step 1: On the Safari Start Page, tap the Edit button.
Step 2: Tap the toggle beside Privacy Report and ensure it shows a green fill.
Step 3: Tap the x button at the top right of the page to close the page. The Privacy Report will feature on the start page. With the details of your privacy report, you can determine how you want your Safari Privacy and Security Settings set up.
How to Control Privacy and Security Settings for Safari
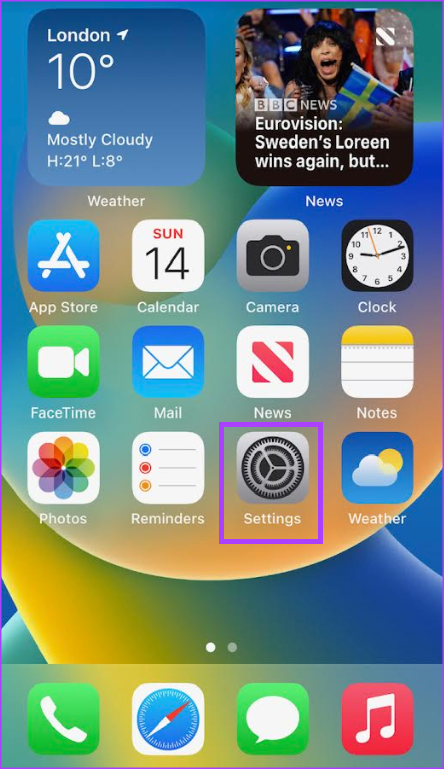
Here’s how you can tweak your privacy and security settings in Safari. Step 1: Tap the Settings app on your iPhone.
Step 2: Scroll down and tap Safari Settings.
Step 3: Scroll down Safari Settings to the Privacy & Security Section.
Step 4: Tap the toggles beside any of these options to enable or disable them:
Prevent Cross-Site Tracking Block All Cookies Fraudulent Website Warning Privacy Preserving Ad Measurement Check for Apple Pay
Step 5: Tap the Hide IP Address option and choose whether to Turn it Off or Hide From Trackers.
If these options were previously disabled, data relating to them were previously stored in your browser cache. You can clear your browser cache using the steps below.
How to Clear Safari’s Browsing Cache
Here’s how to clear the browsing history, cache, and cookies for the Safari browser. Step 1: Tap the Settings app on your iPhone.
Step 2: Scroll down and tap Safari Settings.
Step 3: Scroll down Safari Settings and tap the ‘Clear History and Website Data’ option.
Step 4: On the pop-up notification, confirm your action to ‘Clear History and Data.’
If you prefer not to use Safari’s Private Browsing mode, you can still prevent your IP address from getting tracked using iCloud Private Relay.
How to Protect Your IP Address on Mobile Data and Wi-Fi Using iCloud Private Relay
If you subscribe to iCloud+, you can use iCloud Private Relay to prevent your IP address from being disclosed. iCloud Private Relay will encrypt the traffic leaving your iPhone, thereby ensuring your IP address is not disclosed. Here’s how to turn iCloud Private Relay on over a Wi-Fi and mobile network.
How to Turn iCloud Private Relay On for Wi-Fi
Here’s how to turn iCloud Private Relay on for a Wi-Fi network. Step 1: Tap the Settings app on your iPhone.
Step 2: Scroll down and tap Wi-Fi.
Step 3: Tap the ‘i’ symbol beside the Wi-Fi network you have connected.
Step 4: Scroll down and tap the toggle beside ‘Limit IP Address Tracking’ to enable it.
How to Turn iCloud Private Relay On for Mobile Data
The iCloud Private Relay option would make sense when you’re on a faster Wi-Fi network. But if you want to use it while you browse the web or use the apps on mobile data, you’ll need to switch on that option. Here’s how to do that. Step 1: Tap the Settings app on your iPhone.
Step 2: Scroll down and tap Mobile Data.
Step 3: Tap the toggle beside Mobile Data to enable it.
Step 4: Tap Mobile Data Options.
Step 5: Tap the toggle beside Limit IP Address Tracking to enable it.
Hiding Your Email With iCloud+
A subscription to iCloud+ does not only provide you with access to iCloud Private Relay for protecting your browsing privacy. You can also extend your internet privacy with iCloud+ using its hide my email feature. This way, you can control who has access to your inbox. The above article may contain affiliate links which help support Guiding Tech. However, it does not affect our editorial integrity. The content remains unbiased and authentic.


