But what if the feature stops working like it is supposed to? This is a problem faced by multiple users who cannot use this inbuilt file-sharing feature. We will list multiple methods to help you resolve this issue at the earliest.
1. Examine Nearby Sharing Settings
Nearby Sharing works if the devices are discoverable. So, you need to ensure that you did configure it correctly. Here’s how: Step 1: Press the Windows key to open the Start menu, type Nearby Sharing in the Search bar, and press Enter.
Step 2: In the Settings app window, examine the Nearby Sharing settings. Make sure that it is set to Everyone nearby or My devices only.
Step 3: Close the Settings app.
2. Place Both Devices in the Same Room
Nearby Sharing uses Wi-Fi and Bluetooth. Both these features support short-range communication. If the Windows devices are very far apart (more than 20 feet), it will be difficult to establish and maintain connectivity. So, move the two devices close to make Nearby Sharing work flawlessly. If you have a big room, both devices must be preset in the same room.
3. Ensure Both Devices Connect to a Common Wi-Fi Network
Nearby Sharing requires the devices to connect to a common Wi-Fi network to work. Press the Windows + A keyboard shortcut to open Action Center and click on the Wi-Fi icon. Connect to the personal home/office Wi-Fi network. Repeat this step on the other Windows device and connect it to the same network. Both devices are ready to share files.
4. Verify BLE Support On Both Devices
Nearby Sharing requires Bluetooth Low Energy (4.0) or above to work properly. If either of the systems has an outdated Bluetooth adapter, you will face trouble in getting the feature to work. Repeat the following steps to check the BLE support: Step 1: Right-click on the Start button to open the Power User menu. Select the Device Manager option from the list.
Step 2: Expand the Bluetooth Adapters section. Right-click on the Bluetooth Adapter name and select the Properties option from the context menu.
Step 3: Switch to the Details tab.
Step 4: Go to the Property section and click on the drop-down list. Select the ‘Bluetooth radio supports Low Energy Central Role’ property from the list.
Step 5: If the Value section displays true for this property, it means that the device supports BLE.
Step 6: Close the Device Manager.
5. Configure Bluetooth Service
Windows uses the Bluetooth Support Service and BluetoothUserService to allow the Bluetooth adapter to work properly. If either of these services is not running or encounters a glitch, you will encounter an error while attempting a file share using Nearby Sharing. Here’s how to configure these services: Step 1: Press the Windows key to open the Start menu, type services.msc in the Search bar, and press Enter to open the Service utility.
Step 2: Locate the Bluetooth Support Service in the list and right-click on it. Click on the Restart option from the context menu.
Step 3: Repeat the same process with BluetoothUserService and restart it manually.
Step 4: Now, close the Services utility. Relaunch Nearby Sharing and attempt a file transfer.
6. Run Bluetooth TroubleShooter
Windows offers inbuilt troubleshooters to identify and fix inherent hardware and software component issues. Repeat the following steps: Step 1: Press the Windows + I keyboard shortcut to launch the Settings app. Scroll down the System section and click on the Troubleshoot option.
Step 2: Click on the Other troubleshooters option.
Step 3: Scroll down to the Other section and find the Bluetooth option. Click on the Run button located next to the Bluetooth option.
Step 4: Wait for the utility to find and fix problems with the Bluetooth adapter on your system. Click on the Close button.
7. Change the Network Connection Type
Nearby Sharing works better when the network type is set to Private in Windows. If you use a public network, the file transfer can be visibly slower. So, you’ll need to set the Network to private. Here’s how to do it: Step 1: Right-click on the Start button to open the Power User menu. Click on the Settings option.
Step 2: Click on the Network & internet option present in the left-hand side menu.
Step 3: Click on the Wi-Fi option. Then, click on the arrow button next to the Wi-Fi-name properties option.
Step 4: Select the radio button next to the Private network option. Your Wi-Fi connection is set to private now.
8. Rollback Windows Update
Windows updates can break existing features of your system. It is not intentional and will only be fixed after multiple users file feedback about the issue. In the meantime, you can roll back the Windows update to make Nearby Sharing work properly. Here’s how: Step 1: Press the Windows + I keyboard shortcut to open the Settings app. Click on the Windows update icon.
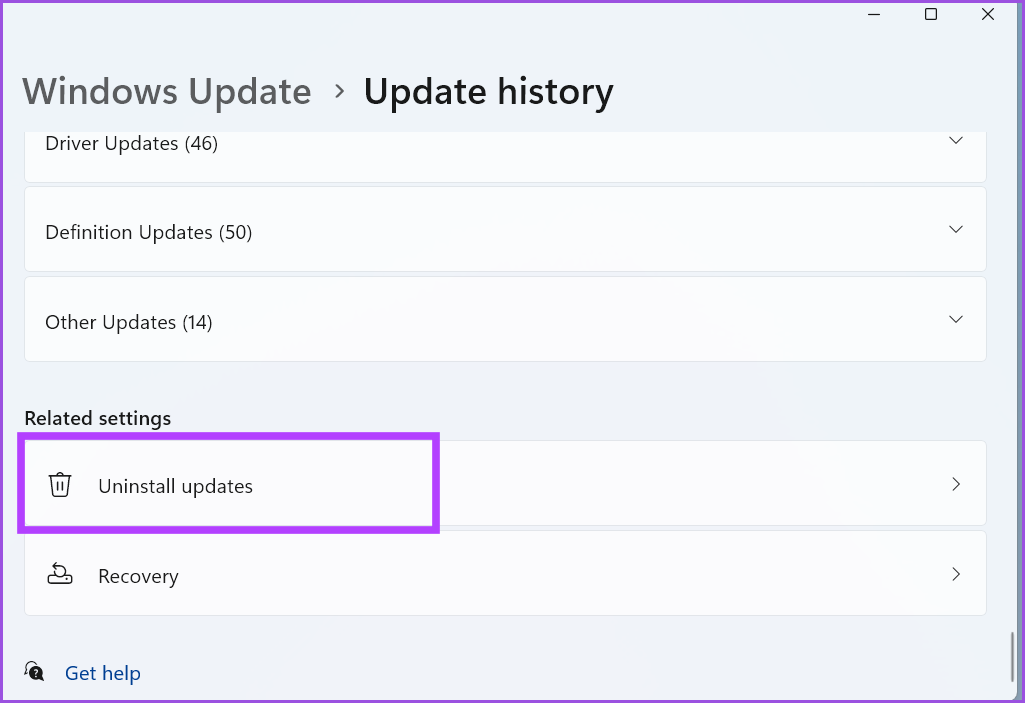
Step 2: Click on the Updates history option.
Step 3: Scroll down and click on the Uninstall updates option.
Step 4: Find the most recent installed update from the list and click on the Uninstall button.
Step 5: A pop-up will appear asking you to reconfirm your decision. Click on Uninstall.
Step 6: Wait for Windows to remove the Update from your system. Step 7: Restart your computer and try using Nearby Sharing.
Get Nearby Sharing Working Again
Windows Nearby Sharing works only with Windows devices. We hope that these methods helped you restore Nearby Sharing to a working state. Google recently launched Nearby Share app for Windows PC which makes sharing files between your computer and Android phone easier. The above article may contain affiliate links which help support Guiding Tech. However, it does not affect our editorial integrity. The content remains unbiased and authentic.