But what if the problem still doesn’t get solved? Like the Bluetooth won’t scan or the battery percentage will refuse to update. Or worst, the battery level indicator would show random changes in the percentage. If that’s the case, you may have to reset the PRAM and SMC on your Apple Mac. But, what exactly does that mean? Read on to find out.
What Is PRAM (Parameter RAM)
PRAM (Parameter Random Access Memory) or NVRAM (Non-Volatile Random Access Memory) is the memory that stores the default values for the nitty gritty details of your Mac. It contains stuff like the alarm clock setting, mouse scaling, startup disk, virtual memory, speaker volume, etc. problems with your macOS-based devices. If there’s something wrong in any of the code on PRAM, it can have a big effect on your Mac’s performance. For instance, the Mac’s performance might become slow and sluggish. Resetting the PRAM to its default state is a smart way to restore things to way they are supposed to be.
Which Macs Let You Perform PRAM or NVRAM Reset
Typically, you can perform PRAM or NVRAM reset on all Intel-based Macs. That includes the portable MacBook, MacBook Air, and MacBook Pro models. It also includes the Intel-based desktop Macs like the iMac and Mac mini.
How to Reset PRAM or NVRAM on Mac
You may think of resetting PRAM as a last resort before heading to the service center. Because it has to do with the core data of the OS, it might change some settings, or reset your data. Resetting PRAM or NVRAM applies to Intel Macs. You can’t reset the PRAM on the newer Macs running M-series chip because they don’t need it. So before jumping in to perform PRAM or NVRAM reset, you should try some of these remedies first.
Press Command + Option + Esc shortcut on the left side of your keyboard to all force quit the running apps. Log out of your Mac and log back in. Turn your Mac off and on again. Perform a hard shut down by pressing the Power key for more than 10 seconds. Keep the Mac turned off for a minute or so.
After that, restart your Mac. If you’re still experience odd behavior from your Mac, it’s time to reset PRAM.
How to Reset PRAM or NVRAM on Mac
Before your resetting PRAM or the SMC, back up your important documents on an external drive. That will ensure that the major fix you apply after you reset PRAM, nothing goes haywire. Step 1: Turn off your Mac. No need to remove the battery or detaching the power chord. Step 2: Hit the Power button to switch on your Mac and quickly hold down the Command + Option + P + R keys at the same time. Step 3: Hold down all four keys until you hear the Mac boot with startup sound twice and the Apple Logo appears. The startup sound for the second time means you’ve reset the PRAM. After that, let your Mac boot up and
What Is SMC
SMC stands for System Management Controller it only applies to Intel based Macs. For the Apple M-series chip based launched since November 2020, it’s not possible to reset SMC on them since they don’t have the component. Instead, you’ll need to run the Apple Configurator to restore the firmware on compatible Mac models. So you won’t need to reset SMC on M-series chip-based Mac. For the newer M-series Macs, turning them off and leaving them for at least 30 seconds before turning them on is quite close to resetting the SMC. The SMC controller stores details related to power and temperature details of the Macs. If something goes wrong, resetting the SMC to default state is a good idea. Apple’s support page has a long list of symptoms that can be solved by resetting the SMC. Some of the major ones include:
Fan running on high speed even though the CPU is not under heavy duty. Keyboard backlight or status indicators not functioning properly. Battery not charging properly or the computer shuts down unexpectedly. The computer is performing slower than usual and apps freeze after launching. Selecting external video source not working.
While the list of hardware-specific problems is long, resetting the SMC aims to set things to the factory state.
How to Reset SMC on Mac
The instructions for resetting SMC are different depending on the battery on your Intel-based Mac.
For MacBooks With Removable Battery
This method is for advanced users. If you don’t know how to remove the backplate and detach the battery, read up on it first. Step 1: Shut down the Mac, remove the back plate and disconnect the battery. Step 2: Press and hold the power button for five seconds before releasing. Step 3: Connect the battery and turn the Mac back on.
For MacBooks With Non-Removable Battery
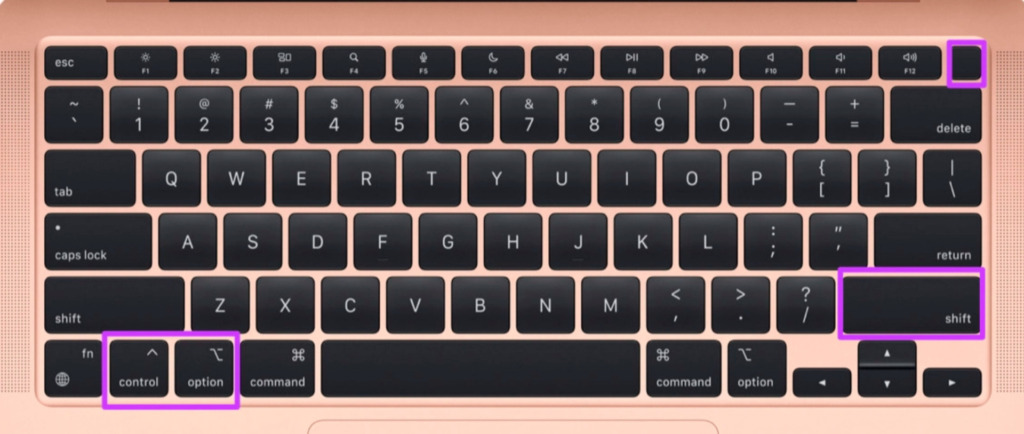
Step 1: Shut down the Mac and make sure it is plugged in to a power source. Step 2: When the Mac is off, press and hold Shift + Control + Option keys on the keyboard and Power button. Step 3: Release all four keys at the same time. If the Mac powers on during this time, start over again till it doesn’t after this step. Step 4: Press the power button to turn the Mac back on.
For MacBooks With T2 Security Chip
Step 1: Turn off your Mac. Step 2: Press and hold the Power button for 10 seconds and then release it. Step 3: Wait for a few seconds and then press the Power button again to start the Mac and repeat the SMC reset steps mentioned above.
For iMac, Mac Pro and Mac Mini
For the desktop Macs featuring the T2 security chip, you’ll need to cut off the power temporarily. Step 1: Shut down and unplug the power cord for the Mac. Step 2: Keep the Mac unplugged for 15 seconds. Step 3: Plug the power cord back in but don’t turn it on for at least 5 seconds. Step 4: Power on your Mac.
When Is a Good Time to Reset PRAM and SMC
Don’t think of this process as routine maintenance like cleaning up your browser cache. You only need do this when there’s a problem that doesn’t solve with troubleshooting. Also, note that the PRAM or NVRAM reset and the SMC reset applies to Intel-based Macs only. However, the process might slightly differ for the Macs with T2 security chip. It’s also good practice to reset SMC while you’re reseting PRAM. The process is pretty similar and if resetting PRAM doesn’t solve your problem, SMC might. Even after resetting both, if you’re still facing a problem, it’s time to take your Mac to the Apple Store / Apple Service Station. The above article may contain affiliate links which help support Guiding Tech. However, it does not affect our editorial integrity. The content remains unbiased and authentic.


